Building a home lab Part 2 - Networking Some More
So now we have some hardware and some virtualization hosts set up. Now you can set up your firewall. There are a few things we can do to make this environment easier to maintain. There are lots of great guides on setting up PfSense, mine will blaze through that set up to get to the goods. If you want a really great guide on setting up Pfsense, I recommend Building Virtual Machine Labs by Tony Robinson.
The real short version of it is you need to get pfsense from here and upload it to your lab, create a VM, load the pfesnse ISO, enable VirtIO driver support, and then configure the WAN interface before you can get to any fun stuff.
Setting up the VMs
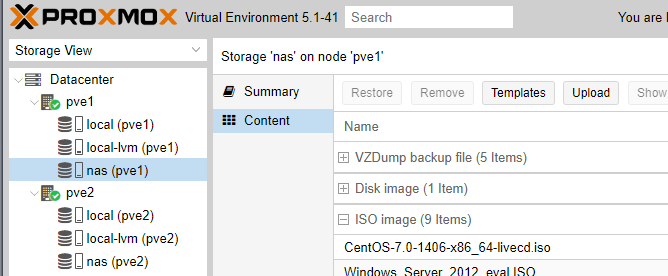
To upload the iso, go Storage View > Select either node (since we configured them both to mount the NAS, it doesn’t matter which one) > Content > Upload.
Go back to Server View and click Create VM at the top right. Name it something reasonable (pfsense1 anyone?), set the storage option to “Use CD/DVD disc image file (iso)” and select your nas and the ISO image you just uploaded.
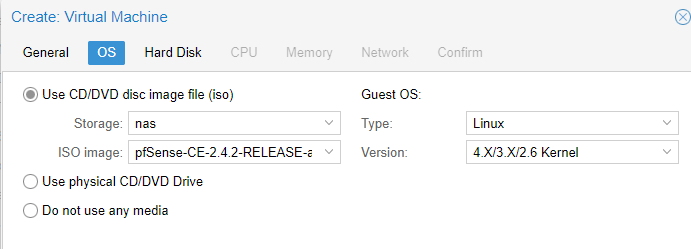
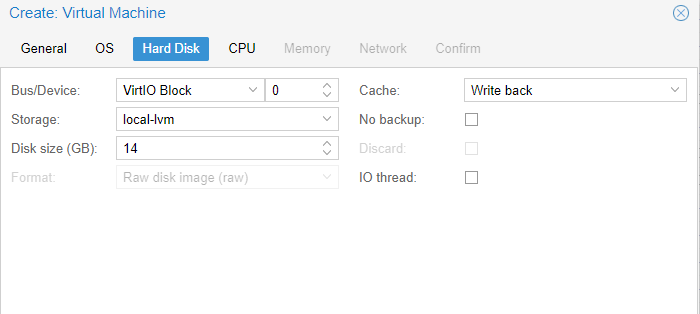
Your OS options should be fine as-is, and then I used 1 socket, 2 cores, and 2048MB of RAM, which is probably overkill. Enable memory ballooning as we’ll add the drivers to support it later.
For the first network device, we’re going to bridge this onto your lan. This means your home lab PfSense router will face your network, but everything else will be NATed behind it. Attach this device to vmbr0 and set the Model to VirtIO (paravirtualized).
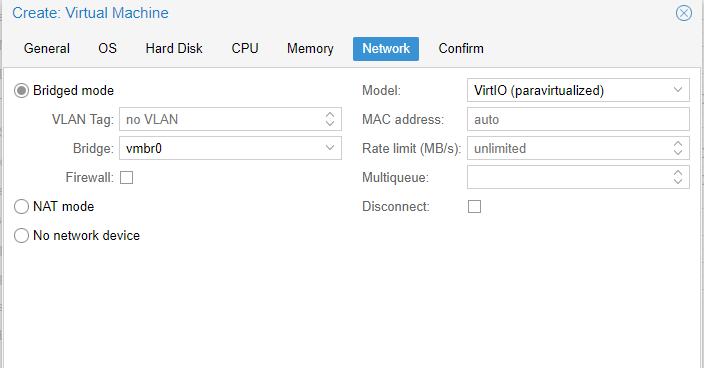
Note the MAC address that is generated for this interface. If you want it to come up on a predictable IP, configure this mac address as a static assignment just like you did for the ProxMox hosts.
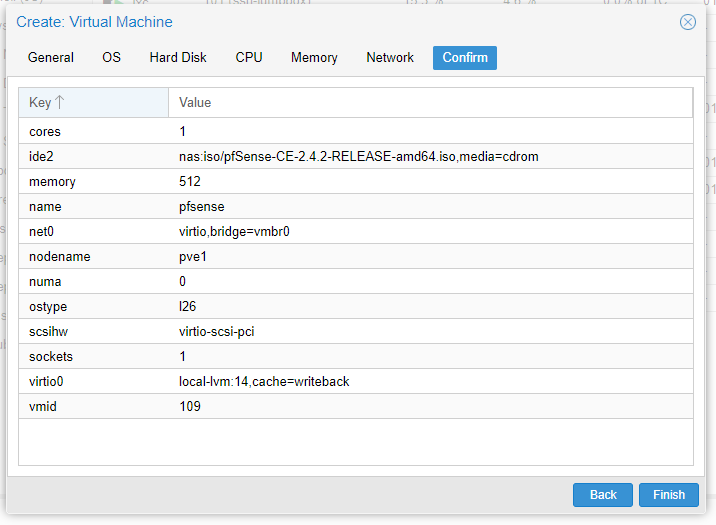
Before you start the VM, select it and edit the hardware. Add another network device, but this time attach it to vmbr1 and again set it to VirtIO.
Start the VM and hope for the best. It should boot and let you install pfsense, I just used all defaults the whole way. When the install is wrapping up, it asks you if you want to drop into a console to make any edits. Select yes and do this edit /boot/loader.conf
1
2
3
4
5
virtio_load="YES"
virtio_pci_load="YES"
if_vtnet_load="YES"
virtio_balloon_load="YES"
virtio_blk_load="YES"
Save the file, reboot, and you have pfsense installed! It’ll boot and then you can hit it through the console by clicking on the VM in ProxMox’s Server View, selecting the VM, and using the console to manage it. It’ll run you through some setup, again, I selected defaults and let it DHCP itself onto the network. It’ll come up wherever it wants or at the address it was staticked to earlier.
During this setup, I don’t configure VLANs yet. I save those for later, I like to do it all at once in the GUI.
Accessing the Admin Console
You won’t be able to hit the management interface with the default configurations, it’s blocked to the WAN interface. There’s documentation on setting it up here but that assumes you can hit the web admin console from the Lan. Since this is a new environment, we don’t have anything on there yet.
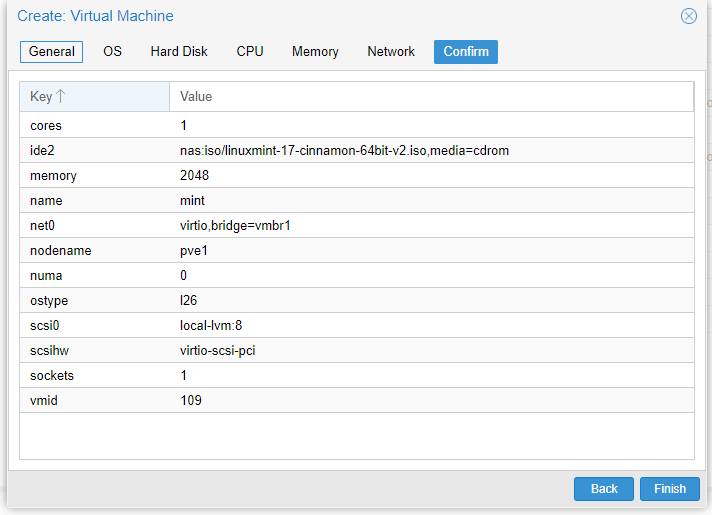
I uploaded a Linux Mint ISO to my NAS storage and deployed a VM to the vmbr1 network, you can use any live ISO you want, you just need a browser really. Launch it as live image, don’t bother installing it, but launch the browser and you can hit the pfsense admin console at LAN gateway, probably 192.168.1.1.
Configuring PfSense
Log into the admin console, the default credentials are admin/pfsense, make sure you change that if you care. Configure your hostname and domain (match your router’s domain, don’t choose anything.local if you have any macs because .local messes with their network auto configuration).
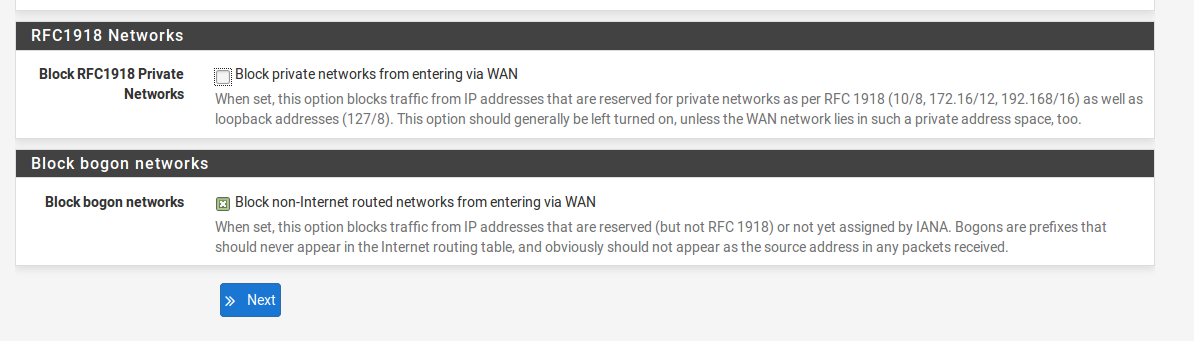
I set my primary DNS to my router and secondary to Google. Static the WAN interface to an IP you want it to be on if you haven’t already or leave it DHCP. On Step 4 of 9, disable the Block RFC1918 Private Networks option. You can do the rest, now follow the recommendations from pfsense.org earlier to enable remote admin. Your firewall rule should look like the top rule (the others come in later) this:

NOW you should be able to manage the console through the WAN interface over HTTPS and you can throw away this VM. Don’t do this if it’s ever put on the internet or you stop trusting your network.
Since we have this on our LAN, we’ll need to go to Interfaces > WAN > Reserved Networks and disable the checkbox that Blocks networks and loopback addresses.
We’ll also need to poke this hole in the firewall to allow you to manage the firewall directly.
One handy change I made was under General > Setup > WebConfigurator, I changed Top Navigation to “Fixed” because it prevents the top menu bar from getting lost when the browser isn’t full screened. Following the recommendations here, disable hardware checksum offloading.
VLANs
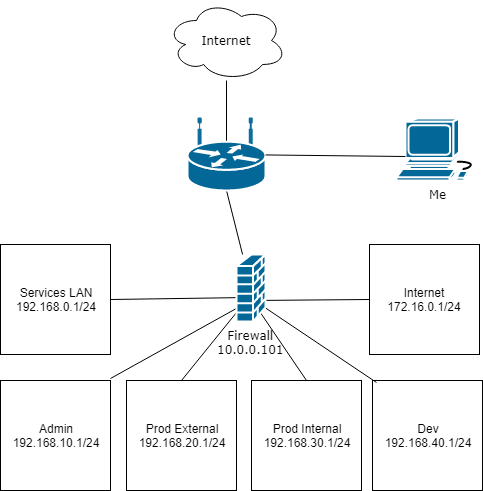
So here’s where you build whatever your heart desires. With my network, I wanted to represent an environment following “alright practices” - not the best, not the worst. I have a LAN services network, an “office/admin” network, development network that includes “external” and “internal” services like web servers and databases, a Production Internal, Production External, and an “Internet” network where attackers will come from. This is a rough map of what I built:
Change what you want about that, but if you want to build just that, you need to go to Interfaces > VLANs and build this:
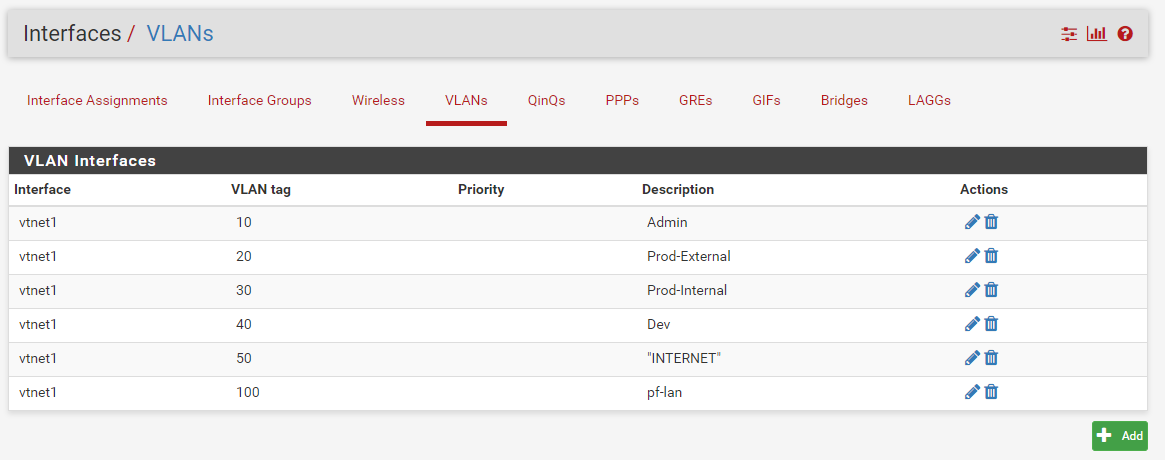
Once you’ve created the VLANs, you’ll need to assign them to an interface under Interface > Assignments. Each of the interfaces is all getting assigned to vtnet1 like this:

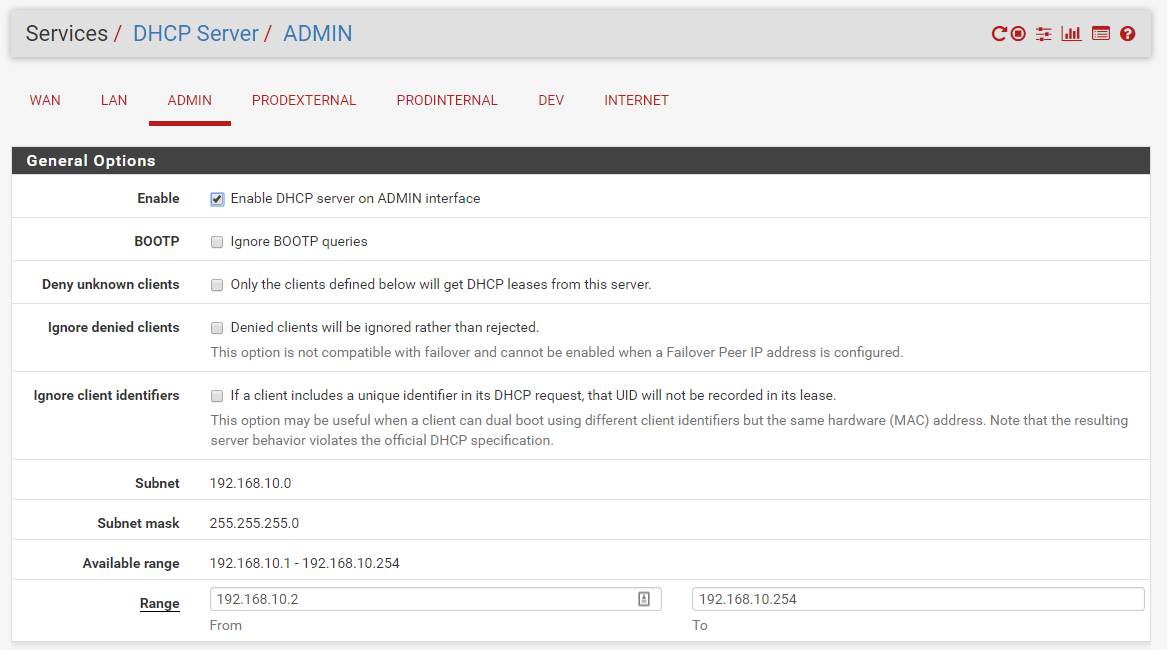
Now you need to go to Services > DHCP Server and configure each of the interfaces like I configured my admin interface. I recommend you use /24’s for each of the interface, it makes a lot of what we’ll do with ansible much easier (I learned this the hard way).
Firewalls!
Whew. We’re almost done. Our firewall rules are going to provide two rules at least, one that allows all traffic from the Admin network into the network and allows all traffic out. This isn’t best practice, but it’s something very simple to start with for every network that you can tune and tighten as you finish up your lab. Go to Firewall > Rules and configure rules that look like this for each non-WAN interface:

For my “internet” VLAN, I allow all traffic in and out because it’s supposed to simulate the internet.
Wrapping up
If you followed these steps, you should have a very basic network built. You can drop devices anywhere you want to and they should work. VLANs keep the traffic separate and firewall rules let stuff talk to each other. If you’re still with me, congrats. The next post will build some infrastructure you’ll use to deploy the rest of your images and start messing with ansible. Thanks for reading.