I got distracted. I’ve done quite a bit of work on the incident response type lab I’ve been working on, but I also got interested in Docker and Docker Swarm. I’ve built that and it works so I figured I’d write that down first. This post will cover a few things I’ve done for myself to make all my projects easier.
SSH Jumpbox
I created an LXC container in a VLAN that has access to everything, its my jumpbox server. I use SSH key authentication to get into it, but I created a key on that system that I use to configure my systems when they’re built. You want to give this more space than the default 8GB for a container since you may keep files and resources here
It’s handy to have a jumpbox server if you have multiple systems you’ll access your cluster from. Copy your public key to the authorized_keys file on the jump host (using the console in proxmox so you don’t have to open password auth to the jumpbox) and then every device can just have your jumpbox key on it. You can also use something like DUO to secure the jumpbox further.
Once inside your jumpbox, you can move freely around your network.
Local image store
You know how you have to download ISO’s each time you want to install a new VM? Don’t do that over and over. I keep everything on my desktop in an HDD where storage is cheap and use them as backup. It’s nice to be able to have older images on hand (which might still be available online but seem to take longer to download when you need them).
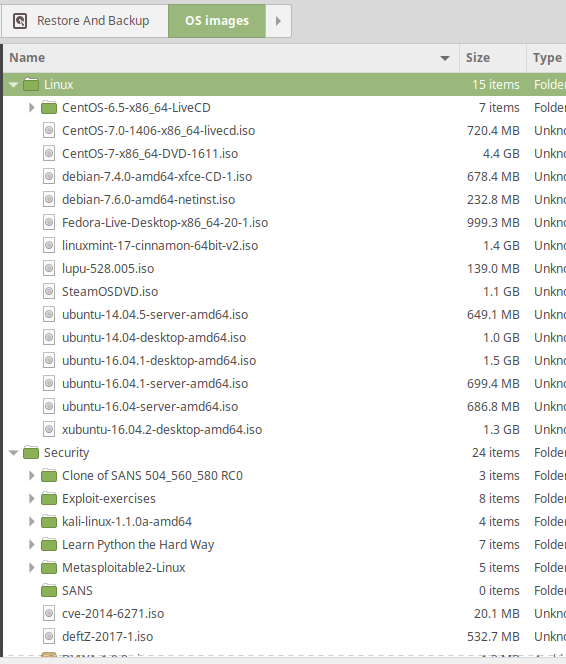
For ISOs you expect to use frequently, load those to the NAS share we created earlier attached to DD-WRT. This makes them quickly available to any VMs you install in Proxmox. From slowest to fastest, its Internet < HDD < ProxMox Nas < Clone an existing VM.
For LXC templates, store those in your NAS too. If you want to refresh the availabe VMs, you need to run “pveam update” on your ProxMox hosts. That’ll fetch new images you can create containers from. Again, store those on your NAS.
Apt-cacher-ng
Once you have images and containers deployed, you should generally keep them updated unless you have a specific reason not to. Frequent updates take a long time and on metered connections can be expensive. To work aroudn this, install and use apt-cache-ng This service is super userful. I know it works for Ubuntu and for other distributions, but I’ve only used it for Ubuntu. You’ll need to set up something on both the apt-cacher-ng server and tell your clients to use it.
Server Setup
This one’s pretty easy. You need to install the service, update the config, and restart it. There are a lot of options in my config, but I have only a few that matter. This is my file with all comments and blank lines removed:
1
2
3
4
5
6
7
8
9
10
11
12
13
CacheDir: /var/cache/apt-cacher-ng
LogDir: /var/log/apt-cacher-ng
Port:3142
BindAddress: 0.0.0.0
Remap-debrep: file:deb_mirror*.gz /debian ; file:backends_debian # Debian Archives
Remap-uburep: file:ubuntu_mirrors /ubuntu ; file:backends_ubuntu # Ubuntu Archives
Remap-debvol: file:debvol_mirror*.gz /debian-volatile ; file:backends_debvol # Debian Volatile Archives
ReportPage: acng-report.html
PidFile: /var/run/apt-cacher-ng/pid
ExTreshold: 4
LocalDirs: acng-doc /usr/share/doc/apt-cacher-ng
PassThroughPattern: .* # this would allow CONNECT to everything
PassThroughPattern: download\.docker\.com:443$
Here, we’re storing files in /var/cache/apt-cacher-ng, listing on all interfaces on port 3142, supporting Debian and Ubuntu archives, and I exclude https://download.docker.com. Since this is basically man-in-the-middling your apt updates, https doesn’t like it. You need to exclude packages you upgrade through apt-transport-https or it will fai.
I created this ansible role to install and configure it.
Client Setup
Clients need to be pointed the proxy to use it. You need to create a file (I used 01proxy but files in that directory are loaded as configurations for apt) This is a sample file from one of my hosts:
1
2
3
ubuntu@swarm-wrk1:~$ cat /etc/apt/apt.conf.d/01proxy
Acquire::http::Proxy "http://apt-cacher-ng-server:3142";
Acquire::HTTP::Proxy::download.docker.com "DIRECT";
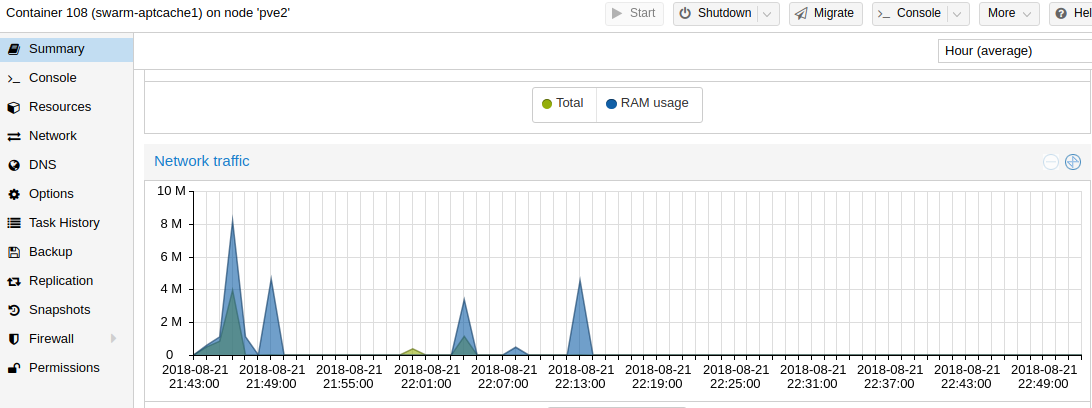
That’s it! Updates are fast, do do-release-upgraded 3 ubuntu servers in just a few minutes since everything was cached locally. You can see spikes in traffic when I update each device.
Snapshot and Automate
I have a few things I seem to do frequently. This includse set up basic packages, configure apt-cacher-ng, install docker, and other things like that. If you’re doing something more than 3 times, automate it.
I’ve written a few ansible roles and playbooks taht speed this process along for me. Ansible was the simplest automation language I could get into, but you can use whatever you’re more comfortable with or what you use at work.
I wrote this set of roles and playbooks because I kept reinstalling Proxmox after breaking my installs. To run it, SSH into your newly installed proxmox host and run the following:
1
2
3
4
5
6
apt update
apt install git ansible -y
git clone https://github.com/remotephone/ansible-proxmox.git
echo "[proxmox]" >> /etc/ansible/hosts
echo "localhost ansible_host=127.0.0.1 ansible_user=root" >> /etc/ansible/hosts
ansible-playbook main.yml
This playbook actually covers the install steps from my last two posts in one quick playbook run! It’s pretty amazing what you can make happen with ansible. I’ll update it eventually so I can cover both hosts at once, but for now I just run it once on each one.
Ansible Bootstrapping
Some LXC containers are so minimalist they don’t even have python installed for you to get your ansible playbooks running. I ran into an Ansible bootstrap script some time ago and have adapted it to a role.
1
2
3
4
5
6
7
---

- name: install python 2
  raw: test -e /usr/bin/python || (apt -y update && apt install -y python-minimal)

- name: now gather_facts
  setup:
Running this role against a host uses raw commands to set up python-minimal which ansible can use to run the rest of what it needs to do and complete more involved tasks. Once that’s run it gathers “facts” about the host. Facts are what ansible uses to know details about the host it interacts with. These can include things like the hostname, free disk space, memory, and all sorts of other things.
Snapshots
If you build a VM or install a new OS, snapshot it. It’s easy to do that and then restore a snapshot when you get something wrong or need to deploy a second similar machine. You can create one pretty easily by clicking on a VM, goign to Backup and selecting Backup now.
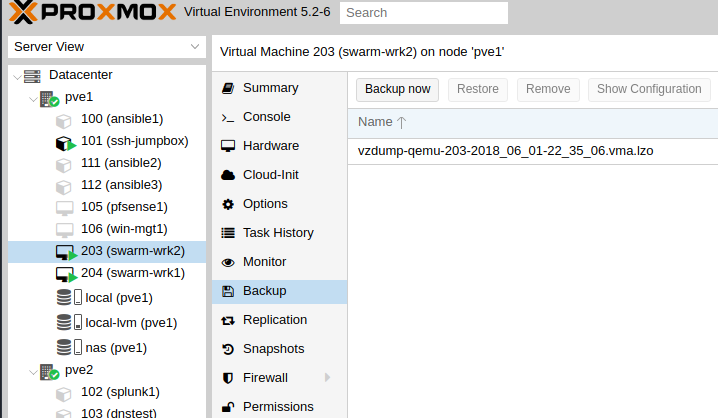
then you can restore or create a new one off a backup.
That’s it
This is a short post where I want you to be able to learn from my mistakes and hopefully do things quicker and more easily. I’d be interested to hear if anything doesn’t work for you. I can’t seem to make my next post what I say it’s gonna be about, but I intend to write about setting up a docker swarm with shared storage to provide services through traefik next. I got it working for the most part, there’s just some bugs I need to work out. Hope this all helps someone!