Proxmox is an open source virtualization solution and a really flexible base for a home lab. This guide will walk through building a simple 2 node proxmox cluster. My deployment tools are ansible and various things built into Proxmox. This guide walks through a lot of the prep work you need to do before you even install Proxmox. I recommend you follow along and get your hardware in order, plan your networking, configure your router, and then connect everything up before you start installing Proxmox.
Hardware
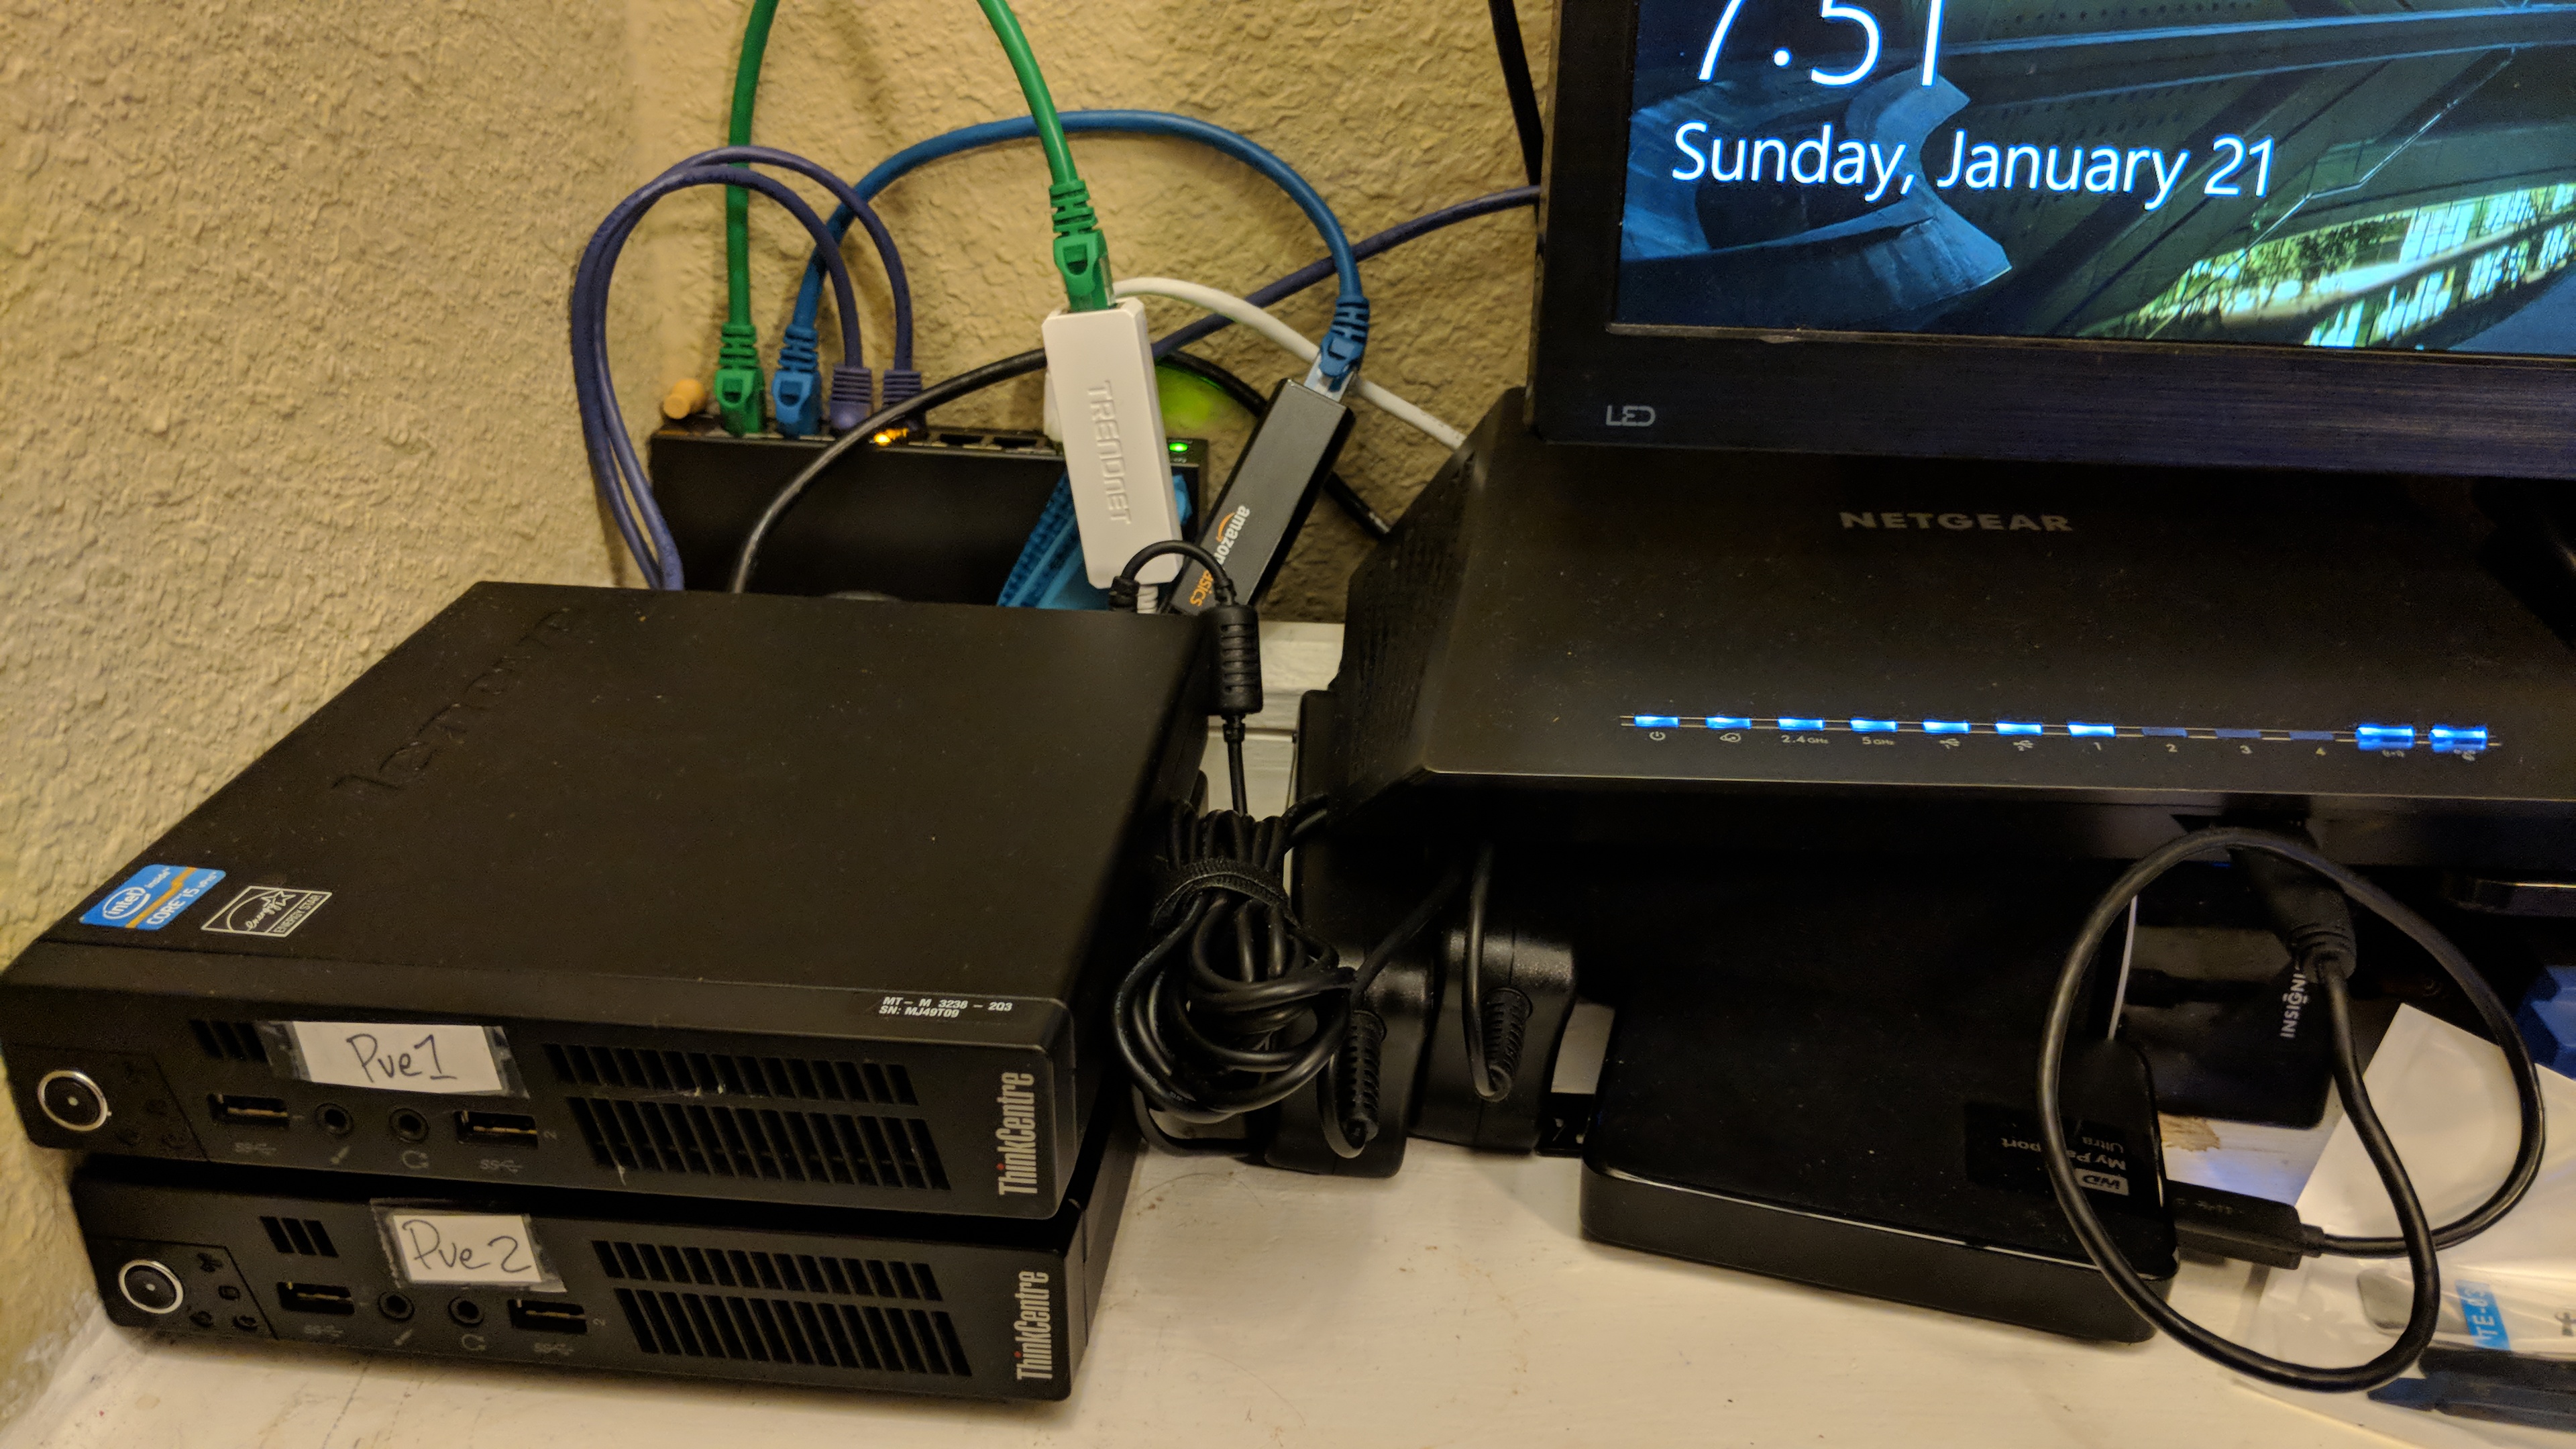
Proxmox is based on a fairly recent version of Debian so it’s extremely forgiving in what it’ll let you install it on. My lab consists of the following hardware:
- 2x thinkcentre m92p tiny’s w/ i5’s and 8gb
- 2x extra usb3 gig-ethernet dongles (trendnet and amazon basics, both worked fine)
- 1x tp-link TL-SG108E 8 port gigabit switch
- 1x dd-wrt router -> cable modem (my home router)
- 1x 87 key Aukey Mechanical keyboard (nice to have, not needed)
If you don’t have hardware yet, watch ebay for a while and be patient. The systems I got at 140 bucks a piece were anywhere from 125 to 450 depending on when I looked. I’m pretty sure they were office worker workstations that served their two years of service and got replaced. Of course, you can also just install this on any two boxes you have laying around. You could also go real fancy and get Intel NUCs, but I managed to keep this full lab price around 450, even with the SSD’s.
Performance and Compatibility Considerations
The big performance limiter I ran into first was disk speed. Running multiple VMs or containers on the same hosts drags with a hard drive, spring for SSDs in each of your systems. I accepted all defaults in my partitioning and used single drives for everything, so I didn’t use any fancy disk formats.
For networking, make sure you have Cat6 cables, a real gigabit switch, and don’t bother trying to get this stuff to work over wireless. Bridging over wireless is either impossible or too much trouble to get working for this lab’s purposes, depending on your tolerance troubleshooting that sort of thing. The time I wasted trying to figure it out was worth way more to me than the 30 dollars I ended up spending on the dongles.
Networking - DD-WRT
I use dd-wrt for my home router OS. It makes a lot of what I’m doing easier, but updated support for hardware varies. The main www.dd-wrt.com is the place to go for most questions, but the resources at my open router are excellent. If you don’t already have a router that supports dd-wrt, I strongly recommend you pick one based on what someone at my open router supports. Install it using their guides. For updates, go to the dd-wrt beta download site and avoid what’s on the router database, beta has better bug fixes and support.
Judge me if you must, but I wanted this easy to interact with from my home network, so I dumped both my home network and lab into the same subnet. I’ll break it off one day, but that’s the subject of another post.
You’ll need four IP addresses available for each your hosts eno1 and eno2 interfaces. Pick them now, I’m using 10.0.0.11-12 and 10.0.0.21-22.
Some stuff you also should do:
- Make your home subnet a /22. You’ll appreciate the IP space.
- Restrict your DHCP range to something specific, 10.0.0.50-10.0.0.150 for example.
- This isn’t required but makes keeping your networks straight in your head easier
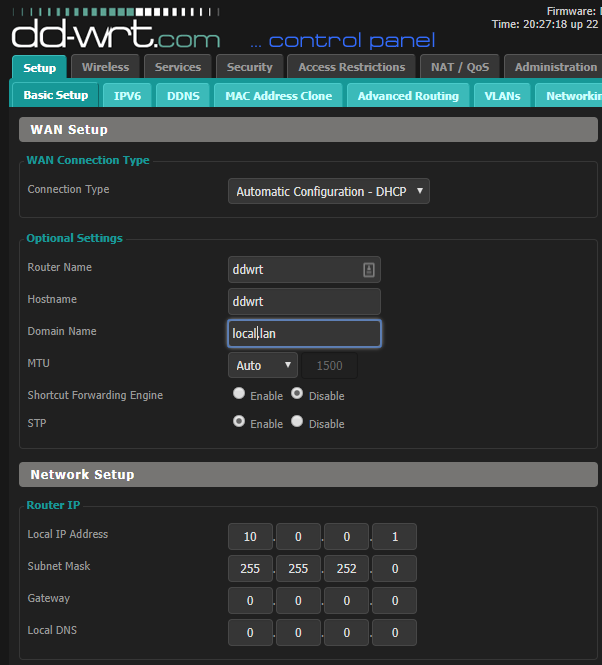
![dhcp]()
- Configure your router name and Configure your domain name.
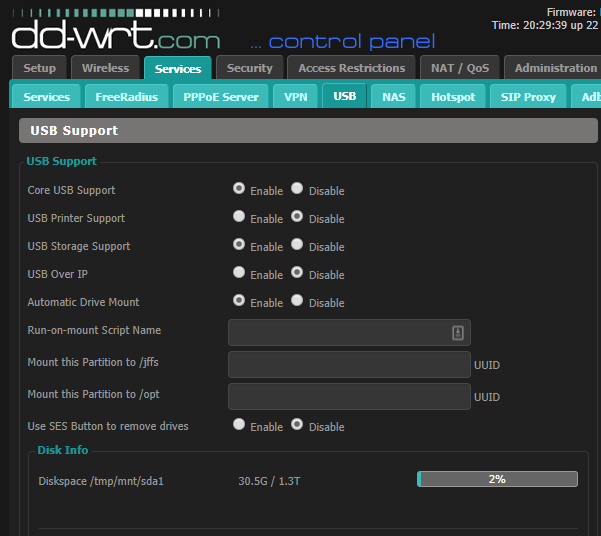
- Enable USB Support under Services > USB
![usb]()
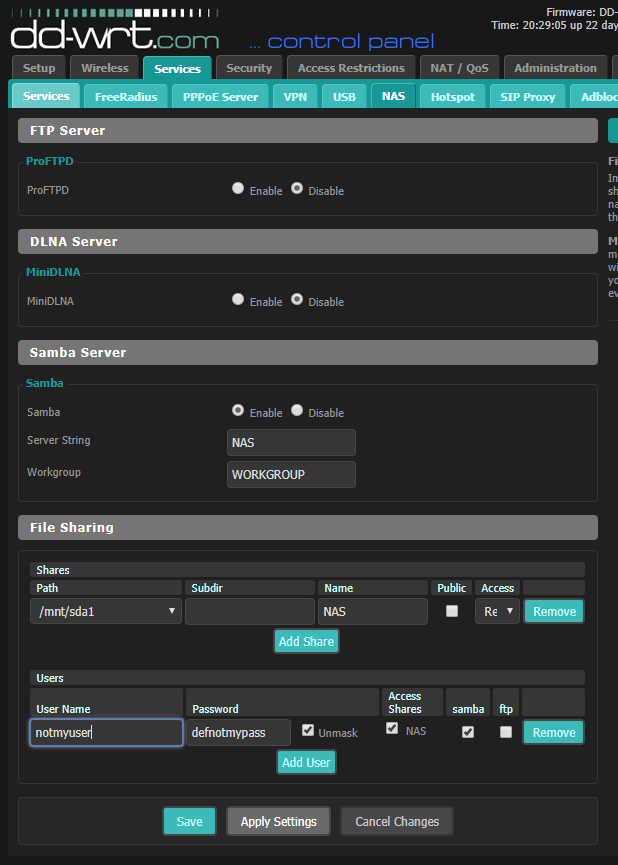
- Enable NAS support. Proxmox will store images here.
![nas]()
- Create a backup of your configuration once you have something that works
When it’s done, you’ll have the basis to build this:
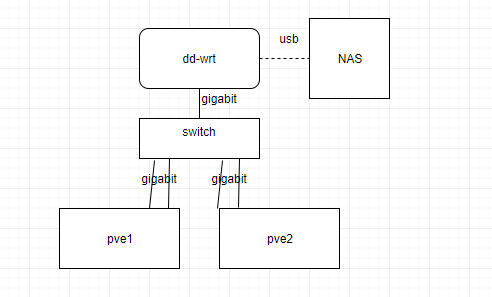
Networking - Switch
Configure your switch for the last IP of your network range. You’ll need to connect directly to it and static an IP if you use the same tp-link family of switches I have. I couldn’t find anything with feature parity at the same price (18 bucks on sale) but if you get something else you need VLAN support.
I connected my switch to a single port on my router and used VLANs to do network segregation on the switch. With the configuration I use, everything in my lab can be accessible from my home network but we avoid switching loops and and broadcast issues. This is my vlan configuration:
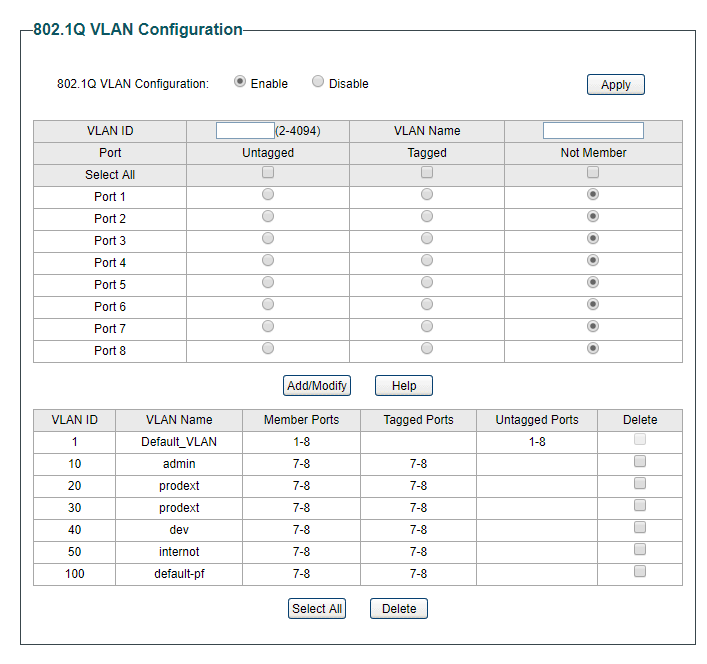
With that VLAN configuration, you’re ready to go. Connect eno1, the built in ethernet to ports 5 and 6. Port 7 and 8 will connect your dongles.
Installing Proxmox
Install both hosts one at a time. You’ll need a keyboard and monitor. If you don’t own two monitors for your desktop, this whole process will convince you it’s worth while. I also found it worth my while to get an additional keyboard for this. You’ll break networking every now and then if you mess with your interfaces and you’ll need to fix it and its just nice to have another keyboard and monitor to terminal in while you use the other for research or googling how tos.
Use the etcher tool to create your install disk, it’s the easiest way that works. The instructions here will do you well for your installation process.
Install on the first host. I chose the hostnames pve1 and pve2. I staticked IPs predictably to make them easy to remember and work with. I accepted defaults throughout the installation process. My file system is ext4 because I only have a single disk and I used LVM, again the default. Easy peezy, now you have two nodes with proxmox installed. They should come up after the install and reboot and be ready to go. You should be able to SSH into them with the root password from your local network.
Preparing the systems
You’ll need to SSH into each host, add your SSH key if you so desire, and then do this configure the free repositories for updates and install them, unless you want to pay for support:
1
2
3
4
5
6
7
rm /etc/apt/sources.list.d/*
echo "deb http://download.proxmox.com/debian/pve stretch pve-no-subscription" > /etc/apt/sources.list.d/pve-install-repo.list
wget http://download.proxmox.com/debian/proxmox-ve-release-5.x.gpg -O /etc/apt/trusted.gpg.d/proxmox-ve-release-5.x.gpg

apt update
apt install openvswitch-switch
apt upgrade
Add your NAS to the /etc/fstab file of each Proxmox host. Use a credentials file for better security.This is an example of the line you’ll add to your fstab file:
//mynas/media /mnt/bindmounts/media cifs rw,credentials=/home/.smbcredentials-mynas,vers=2.0,noperm,auto 0 0
If you use DD-wrt and aren’t using a recent version, you’ll need to specify version 1 with “vers=1.0”. Use an updated version.
Add these lines to /etc/sysctl.conf.
Edit /etc/sysctl.conf to do the following (you could just as easily paste it in at the bottom):
1
2
3
4
5
6
7
8
9
10
# Uncomment the next line to enable packet forwarding for IPv4
net.ipv4.ip_forward=1

# disable ipv6
net.ipv6.conf.all.disable_ipv6 = 1
net.ipv6.conf.default.disable_ipv6 = 1
net.ipv6.conf.lo.disable_ipv6 = 1

# increase max_user_instances to allow more containers
fs.inotify.max_user_instances = 1024
You’ll thank me later for this one, but you’ll notice your second network interface has some crazy name that includes the mac address in it. This long name causes all sorts of problems and is at the very least a pain to type over and over, so rename the interface eno2. You can do that by inserting the following line into /etc/udev/rules.d/10-network.rules with your proper mac address.
1
SUBSYSTEM=="net", ACTION=="add", ATTR{address}=="XX:XX:XX:XX:XX:XX", NAME="eno2"
Finally, configure your hosts file on each of the nodes to look like this, modifying it depending on what node you’re on:
1
2
3
4
root@pve1:~# cat /etc/hosts
127.0.0.1 localhost.localdomain localhost
<IP pve1> pve1.local.lan pve1 pvelocalhost
<IP pve2> pve2.local.lan pve2
Reboot and verify your interface name and all the other changes took.
Configuring your cluster
This is so easy you’re gonna love it. Reboot first so you know all your changes took. Create your cluster and pick a name, ssh into the other host and add it. Proxmox configures ssh keys and all sorts of other services. If you want a cluster named cluster, use these steps, otherwise, customize it to your liking.
The steps here outline what needs to be done pretty well, but basically, create the cluster on pve1, ssh in pve2 and add it to the cluster. That’s really all there is to it. It does the rest. You can then launch your browser and get to the console.
You can mess aroudn in in the console if you want, but you need to set up your interfaces files before you deploy any images or devices. I wouldn’t bother editing them through the GUI, there’s some options that are different to configure through the console such as mtu and anything else beyond the basics.
Modify the following /etc/network/interfaces file to match the IPs for your lan for each host, back up the existing interfaces file (move it to /etc/network/interfaces.old), and drop in something that looks like this:
1
2
3
4
5
6
7
8
9
10
11
12
13
14
15
16
17
18
19
20
21
22
23
24
25
26
27
28
29
auto lo
iface lo inet loopback

allow-vmbr0 eno1
iface eno1 inet manual
        ovs_type OVSPort
        ovs_bridge vmbr0

allow-vmbr1 eno2
iface eno2 inet manual
        ovs_type OVSPort
        ovs_bridge vmbr1
        mtu 4000

auto vmbr0
iface vmbr0 inet static
        address  10.0.0.11
        netmask  255.255.252.0
        gateway  10.0.0.1
        ovs_type OVSBridge
        ovs_ports eno1

auto vmbr1
iface vmbr1 inet static
        address  10.0.0.21
        netmask  255.255.252.0
        ovs_type OVSBridge
        ovs_ports eno2
        mtu 4000
Reboot your system here, we now we just need to make sure the NAS comes up when the network does. Create a startup script at /etc/network/if-up.d/mount and make it executable. All you need to have in it is a mount -a to get it all working. The network interface will come up, the NAS will be ready and mounted when you’re done booting up.
1
2
#!/bin/bash
mount -a
Now you need to enable it in the console and tell each node they want to use the NAS for storage. Log in to your console as an admin, click data center at the top left, and the click Storage and Add and pick directory 9(mine’s added already, but here’s what you’re looking for:

Once there, enable all types of storage, set backups to two (it will come in handy later), and save. This may report as unavailable, but once you reboot and your startup script runs, it’ll mount the drive and be ready for use.
Do a final reboot of your nodes. If everything went as planned, you’ve got a 2 host proxmox cluster! Congratulations.
Follow up posts will go into setting up PFSense and other interesting bits in the lab. Thanks for reading.