Move over docker hub
You might have heard Docker changed their pricing plans and free tier storage allowances recently. It caused quite the fuss and is summed up here. Storage and bandwidth isn’t free, so I can sympathize, but that’s neither here nor there.
Github has stepped up to help fill in the gap people perceive, even having the support of Docker to do so. Gone are the days of pulling free public images with no cares, so I wanted to get a service running in my swarm using Github container registry. All my code is there so why not.
Getting Started
First you need a repo. I have a couple of hundred dollars in stocks that I move around with the Cash app. It’s cheap and easy to use, but hard to automate and hard to know what’s going on without checking the app manually. I wanted a way to know if stock prices were changing significantly over a day, so I wrote some simple python to hit the tiingo API within their free limits, send the data to elasticsearch via logstash, and eventually I’ll get elastalert to notify me of significant changes.
As of tonight, I have functional code that will get prices in elasticsearch and a logstash filter to facilitate that. Lots of work to go, but it will run. Now to create the relevant plumbing in github.
TLDR
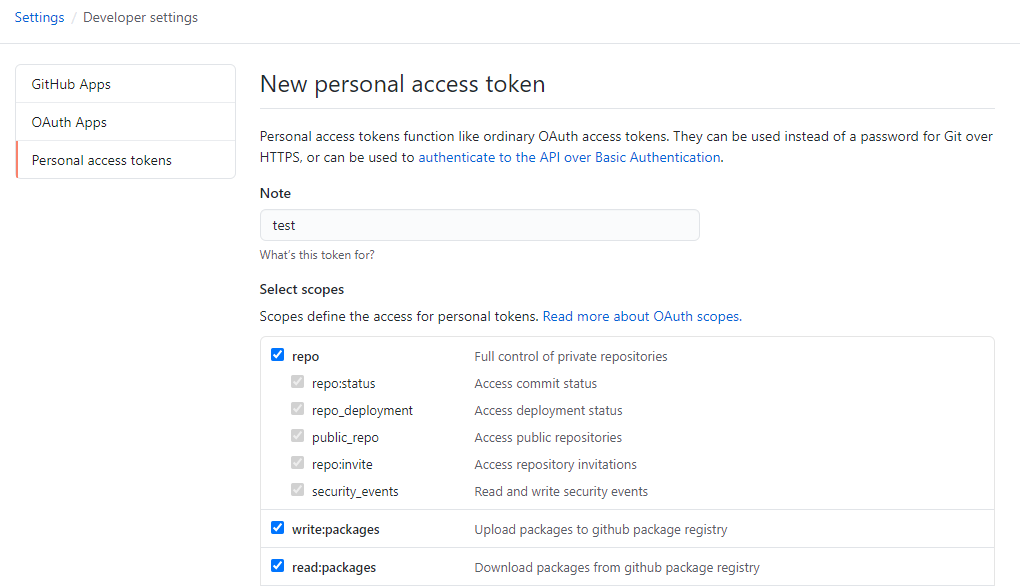
- Create a personal access token
- Give it repo, write:packages, read:packages permissions and save
- Copy the token to your repo secrets, typically at https://github.com/USER/REPO_NAME/settings/secrets
- Make sure what you name your secret matches what’s called in the docker-publish.yaml (CR_PAT by default, line 54)
- Change the image name in line 18
- Start commit, watch the build
Getting the Container Published
Once you have a Dockerfile that will build locally, its time to get it hosted. First you’ll need to create a secret and copy it to your clipboard. You won’t be able to retrieve it later.
Take the secret and add it to your repo at https://github.com/USER/REPO_NAME/settings/secrets. Call it CR_PAT to use their defaults.
Go to the Repo and click Actions and then Create a new action. You can actually append /new/master?filename=.github%2Fworkflows%2Fdocker-publish.yml&workflow_template=docker-publish to any repo you have to get you directly to the workflow creation page.
In the Actions console, you’ll be dropped in to edit the file docker-publish.yml. You can accept mostly defaults, but it highlights the parts you need to change with TODO comments. You’ll need to change like 18 to match your image name which I used as my repo name. Also, if you used a name other than CR_PAT for your token, you’ll need to update that on line 54. You can see my working file here.
If all goes well, you should see in the Actions tab a list of jobs and it should only take a few minutes if your container is simple.
Running the container in a swarm
OK so if all is ready to go you should be able to build and pull. You’ll need to authenticate to the registry and then pull it with your docker-compose file. I am running a docker swarm and that’s how I’ll launch my service. My docker-compose file is pretty simple:
1
2
3
4
5
6
7
8
9
10
11
12
13
14
version: '3.8'

services:
  tiingobeat:
    image: ghcr.io/remotephone/tiingobeat:latest
    environment:
      - STOCKS
      - LOGSTASH_HOST
      - TOKEN
    deploy:
      restart_policy:
        condition: "any"
        max_attempts: 10
        delay: 60s
Without authentication, you’ll get an error like this:
1
2
3
4
5
6
user@swarm1:~$ docker stack deploy -c tiingobeat.yml tiingobeat
Updating service tiingobeat_tiingobeat (id: 1de47xiu5f56nx0vw4mr2sxlt)
image ghcr.io/remotephone/tiingobeat:latest could not be accessed on a registry to record
its digest. Each node will access ghcr.io/remotephone/tiingobeat:latest independently,
possibly leading to different nodes running different
versions of the image.
To fix that, you’ll need to auth and use a special flag when running your service.
First, authenticate to the container registry. You’ll need to generate another personal access token. For this post, I’m just going to run it on the command line which will store it a config file in my user directory. Not ideal, but read more here for other options.
Generate another Personal Access token like we did above, and authenticate with it using this syntax docker login ghcr.io -u USERNAME --password-stdin. Once authenticated, you can simple run your docker-compose command with an extra flag, --with-registry-auth.
1
docker stack deploy -c tiingobeat.yml tiingobeat --with-registry-auth
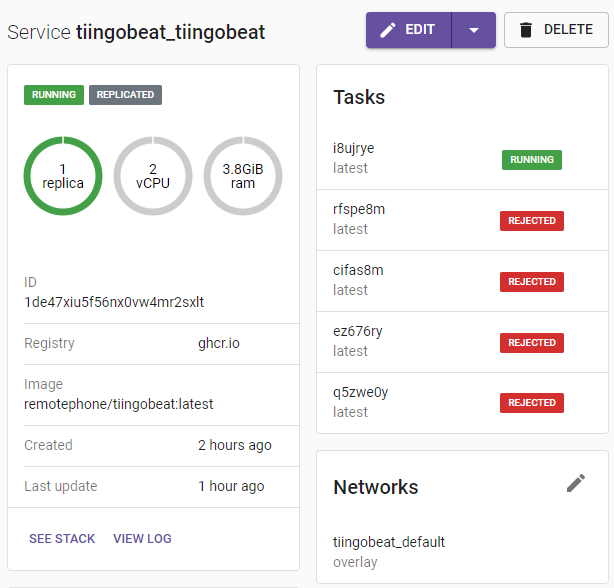
Head on over to whatever your container manager is, I’m using swarmpit, and you can see a successful deployment.
That’s it
So it’s running, your authed, all is well. Figure out a password storage strategy because what I’m doing is not ideal. I’ll fix that in future posts.

