OpenVPN for home use
I run DD-WRT on my home router. It’s great enough and does what I need. I run a VPN on it so I can connect from untrusted networks. My threat model doesn’t include my ISP or the NSA or anyone like that, it’s most frequently just trying to securely connect to resources in my home network over an insecure, untrusted network. Using a VPN back to a network I trust satisfies my risk appetite well enough.
Keeping it Updated
DD-WRT has issues like anything else and needs to be frequently updated. You should not use the versions available on the DD-WRT website, they’re out of date. Updated versions are available here. Find a recent revision and go from there. I’ve had success with Buffalo, Asus, Linksys, and Netgear models. MyOpenRouter.com is an excellent resource to help you pick a Netgear model, which will work fine. Any of the models you see referenced on this page are likely well supported enough.
Documentation - Plentiful and Confusing
The documentation is great, you can find steps for anything you want to do. Whether they will work or not is another story. The official OpenVPN documentation seems hit or miss, following it to the letter often leaves you lost, tracing your steps back and out of order, and generally frustrated. This blog post will document my set up of OpenVPN using certificate and TLS authentication. The documentation here is pretty good, but since OpenSSL passed version 1.0.0 and easy-rsa stayed on version 2, you get weird errors that aren’t documented clearly.
Some Notes About How I Do This
I don’t maintain a persistent CA. I decided against trying to keep this secure or just not losing it since I reimage my machines pretty frequently and really only need this once a year or so. If I have any issues or think I lost a certificate, I would rather blow away the entire setup and start over. It’s not a painful process once you figure it out and I mostly have it automated.
Follow Along at Home
I created a repo here. Follow the steps, build and run the container, and it’ll spit out any number of VPN config files. When you’re done, shred and clean up the leftovers. Mostly painless, but you will be reconfiguring your VPN server each time. This is mostly cutting and pasting the certificates into the DD-WRT console, which isn’t that bad. I cleaned up the output to make it very obvious what goes where.
Some Issues I Ran Into and Fixed
If you use apt to install easy-rsa on Ubuntu 18.04.3, you’ll get easy-rsa version 2.2.2-2. It still works, but you run into issues with some things that haven’t kept up. The one I kept running into was that my version of openssl.cnf did not match the version of openssl installed in Ubuntu, 1.1.0. This gives you an error something like this.
1
2
3
4
5
root@62e75f4951f3:/CA# ./build-key client
grep: /CA/openssl.cnf: No such file or directory
pkitool: KEY_CONFIG (set by the ./vars script) is pointing to the wrong
version of openssl.cnf: /CA/openssl.cnf
The correct version should have a comment that says: easy-rsa version 2.x
To fix this, the container uses a copy of that same file and names it appropriately to match the version of openssl on the system.
Doing this non-interactively means you need to pass some additional arguments during the build process. /tmp/CA/build-ca --batch nopass means you don’t have to provide a password for signing certificates through this CA.
Finally, all the config files include certs inline. Most clients should support this, certainly the ones I use do. This stackoverflow post gave me the idea to use sed to parse out the certificate correctly.
Configuring your VPN Server
General Setup
There are plenty of guides on how to set this up. This one is pretty good and easy to follow. Copied here for redundancy, these are the important parts of the se tup.
1
2
3
4
5
6
7
8
9
10
11
12
13
    Services
    VPN
    OpenVPN Server/Daemon
      OpenVPN: Enable
      Start Type: WAN Up
      Config as: Server
      Server mode: Router (TUN)
      Network: 192.168.2.0
      Netmask: 255.255.255.0
      Port: 1194
      Tunnel Protocol: UDP
    Apply Settings
    Save
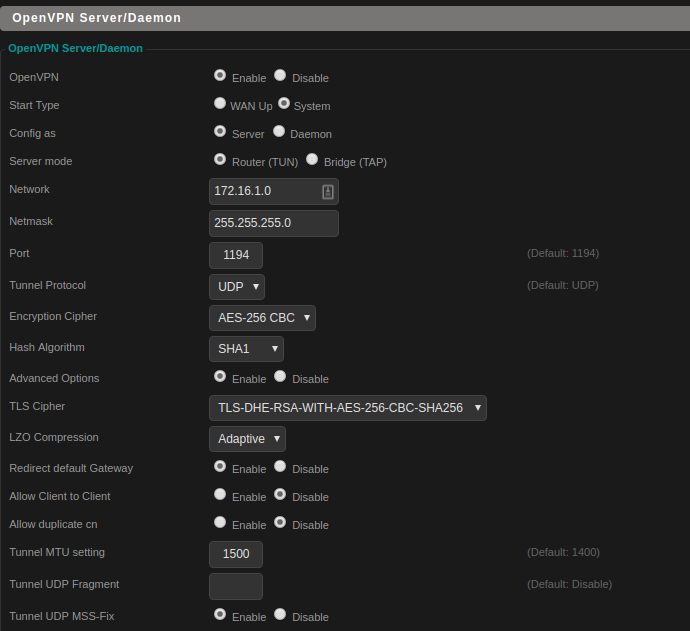
Detailed Setup
These are the configuration options I ended up with on my server. Not all routers support all encryption modes and if you stray from the defaults, expect some trial and error. Make sure you save and apply these too.
Certificates, Keys, Additional Info
This table was super useful and from the DD-wrt documentation here:
| Box | File to insert |
|---|---|
| Public Server Cert (CA Cert) | ca.crt |
| Certificate Revoke List | (blank) |
| Public Server Cert | server.crt |
| Private Server Key | server.key |
| DH PEM | dh1024.pem |
| OpenVPN TLS Auth | ta.key |
This is still confusing (why are there two Public Server Certs???) so the output of the docker container makes it very clear what’s what. Each time, you only want to include the bits between -----BEGIN WHATEVER----- and -----END WHATEVER----- and watch for white spaces, they’ll cause errors.
In the additional config section, drop something like this, but update it to be sure you don’t conflict with your home LAN. Also, remove the comments, mine doesnt have them.
1
2
3
4
5
6
7
8
9
10
11
# Verbose logging, useful for troubleshooting
verb 5
# VPN Device
dev tun2
# route to your home LAN network
push "route 192.168.0.0 255.255.255.0"
push "redirect-gateway def1 bypass-dhcp"
push "dhcp-option DNS 192.168.0.1"
keepalive 10 120
# Tell the server to function as the server during TLS Auth.
key-direction 0
Firewall Rules
Finally, go to the Administration Section and the Firewall section. Add the following lines to ensure you can receive traffic from your VPN and route it appropriately:
1
2
3
4
5
6
iptables -I FORWARD 1 --source 172.16.1.0/24 -j ACCEPT
iptables -t nat -A POSTROUTING -s 172.16.1.0/24 -o br0 -j MASQUERADE
iptables -t nat -A POSTROUTING -s 172.16.1.0/24 -j MASQUERADE
iptables -I FORWARD -i br0 -o tun2 -j ACCEPT
iptables -I FORWARD -i tun2 -o br0 -j ACCEPT
iptables -t nat -I POSTROUTING -o tun2 -j MASQUERADE
Configuring your Clients
Simply import the config files. It’s ready to go. Some clients (rare) don’t support this and you’ll need to break each cert or key into its own file and import them and reference them directly. That’s beyond the scope of this article.
Clean up
I shred and delete the config files once they’re installed where they need to be. I also do a docker rmi -f $(docker images | grep "<none>" | awk "{print \$3}") from here to clean up all remaining images and containers. A docker system prune will do it too, but hope you don’t have anything you wanna keep.
Conclusions
OpenVPN isn’t the most performant, secure, or fanciest VPN solution, but it works for the most part and I’ve been able to automate most of the annoying parts. Feel free to use my setup here if it helps you get there quicker.