My Homelab - Support Services
There’s a few things I run in my lab that support other things happening and make things move along smoothly. They are spread across AWS and services I have running in my lab.
Let’s Encrypt HTTPS Certificate Management in AWS
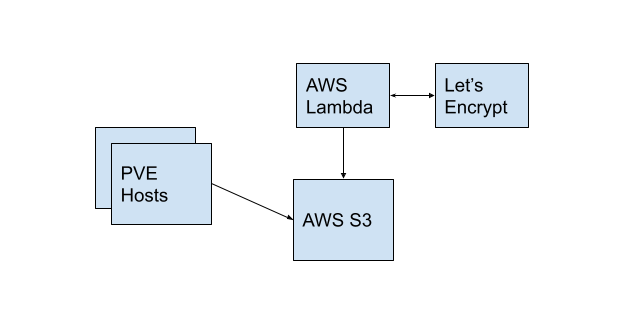
I use AWS Lambda and S3 to generate and store HTTPS certificates for my systems. There are more secure ways to do this, but at the time I started doing this, this was the best way I to avoid exposing services to the internet unprotected and still generate and apply HTTPS certificates. There’s two parts to this.
Proxmox HTTPS Certificates
By default, proxmox will use self signed certificates for their web UI. That’s fine, but I like to hit the domain name and have it work without warnings. To support this, I have a python script that runs on a schedule to retrieve certificates created by AWS Lambda and stored in S3. There’s two parts to this, one which runs in AWS and one which runs on the proxmox hosts.
This is the basic logical flow of things - AWS Lambda runs, talks to Let’s encrypt, updates the certificates every now and then, and then dumps then in AWS S3. On a different schedule, the proxmox hosts cron job runs, which pulls the certificates from AWS S3, puts them in place, and then restarts proxmox services.
Supporting Code
The code for the both parts is contained in this repo https://github.com/remotephone/certbot-lambda. I even created the terraform to deploy the AWS parts and an ansible playbook to deploy the parts that need to run on the server.
So with terraform to deploy the lambda and ansible to configure the hosts, it should just work, but I’d be interested to see if someone runs into problems using it.
The AWS IAM policy I use for my proxmox hosts is pretty restrictive. The impact of my certificates leaking is really low because I don’t do much on here and my proxmox hosts are not publicly routable (remember, we’re using dnsmasq to let us keep this all internal), but it seems reasonable to have a restricted policy.
1
2
3
4
5
6
7
8
9
10
11
12
13
14
15
16
17
18
19
{
    "Version": "2012-10-17",
    "Statement": [
        {
            "Sid": "VisualEditor0",
            "Effect": "Allow",
            "Action": "s3:GetObject",
            "Resource": [
                "arn:aws:s3:::<my_bucket_name>/certs/*",
                "arn:aws:s3:::<my_bucket_name>/live/*"
            ],
            "Condition": {
                "IpAddress": {
                    "aws:SourceIp": "1.1.1.1/32" # My IP hardcoded in, this will not work if my home IP changes
                }
            }
        }
    ]
}
Steps to deploy
Deploying this to your proxmox cluster would go something like:
- Get a domain and get it managed via Route 53. You can buy it from AWS or from someone else.
- Deploy the terraform with variables set appropriately
- Set up the variables for the ansible playbook and run it against hosts.
- Once everything has run, you’re ready to go and it should just work.
So that’s that, it just runs and I haven’t really messed with it since I set it up, except to update the IP address when my IP address changes. You can also easily run the script intereactively if you need to force it to update certs on demand.
apt-cacher-ng
I run apt-cacher-ng to support my swarm. This is a service that acts as a intermediary between your host and apt repositories. When you run apt update and apt upgrade on a system, the system makes a request to the cache for the packages, and if they’re not available, they’ll be retrieved. Once retrieved, it makes subsequent retrievals quicker. This is great if you have a few different hosts on a network all running the same OS and needing similar upgrades, it speeds things up greatly.
We can see the effect if we test against two systems. From the first, when we login, we see updates available.
1
2
3
19 updates can be applied immediately.
3 of these updates are standard security updates.
To see these additional updates run: apt list --upgradable
These are the times for apt update and apt upgrade, presumably when nothing has been cached since last run.
1
2
3
4
5
6
7
8
9
10
11
12
13
14
15
16
17
18
19
20
21
22
23
24
25
26
27
28
29
30
31
32
33
34
user@swarm-mgr:~$ time sudo apt update
[sudo] password for user:
....SNIP
Reading package lists... Done
Building dependency tree
Reading state information... Done
19 packages can be upgraded. Run 'apt list --upgradable' to see them.

real	0m13.099s
user	0m4.481s
sys	0m1.125s

.....

user@swarm-mgr:~$ time sudo apt upgrade -y
Reading package lists... Done
Building dependency tree
Reading state information... Done
Calculating upgrade... Done
The following packages will be upgraded:
  base-files initramfs-tools initramfs-tools-bin initramfs-tools-core libdrm-common libdrm2 libpolkit-agent-1-0 libpolkit-gobject-1-0
  linux-firmware motd-news-config policykit-1 python-apt-common python3-apt python3-distupgrade python3-update-manager sosreport
  ubuntu-advantage-tools ubuntu-release-upgrader-core update-manager-core
19 upgraded, 0 newly installed, 0 to remove and 0 not upgraded.
3 standard security updates
Need to get 118 MB/118 MB of archives.
...SNIP
Fetched 206 MB in 13s (15.7 MB/s)
...SNIP
real	2m18.601s
user	1m32.799s
sys	0m33.851s
Let’s try that on another host that uses the cache. Now, it should have cached the packages that need upgrading. Here we have only 16 to upgrade.
1
2
3
4
5
6
7
8
9
10
11
12
13
14
15
16
17
18
19
20
user@swarm-work1:~$ time sudo apt upgrade -y
[sudo] password for user:
Reading package lists... Done
Building dependency tree
Reading state information... Done
Calculating upgrade... Done
The following packages will be upgraded:
  base-files initramfs-tools initramfs-tools-bin initramfs-tools-core libdrm-common libdrm2 libpolkit-agent-1-0 libpolkit-gobject-1-0
  linux-firmware motd-news-config policykit-1 python-apt-common python3-apt python3-distupgrade python3-update-manager sosreport
  ubuntu-advantage-tools ubuntu-release-upgrader-core update-manager-core
19 upgraded, 0 newly installed, 0 to remove and 0 not upgraded.
3 standard security updates
Need to get 118 MB of archives.
After this operation, 2,609 kB of additional disk space will be used.
...SNIP
Fetched 118 MB in 2s (53.0 MB/s)
...SNIP
real	2m13.902s
user	1m34.218s
sys	0m33.181s
So not really scientific, but you can see the transfer speed is much faster (17m/s vs 53m/s). The big limiting factor was the linux-firmware upgrade, as the boot images were generated it took up a lot of time. I’ll be honest, I was hoping for something more dramatic, but at least the network transfer speed is clearly faster.
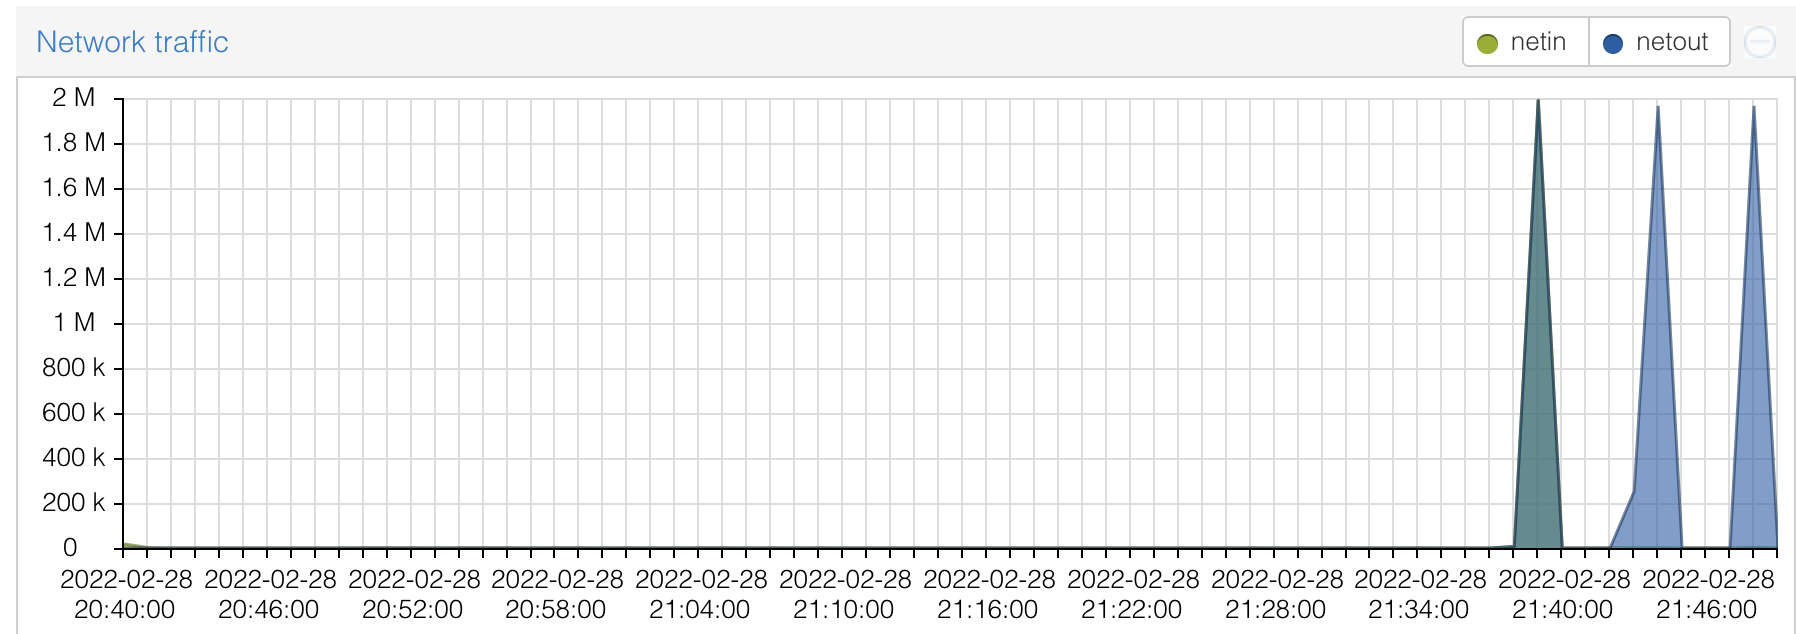
If you are using something like ansible to upgrade multiple hosts at once, you’ll notice more significant improvements in overall time since a big limiting factor can be your pipe to the internet. You can see the traffic hit your apt-cacher-ng host as well, proxmox makes this really easy.
- Select the node that hosts your apt-cacher-ng system
- Click into the host
- Scroll down to see network trafffic.
Deploying apt-cacher-ng
I deploy the service on an LXC container since its relatively lightweight. This playbook could use some love, but it is what I used to deploy the server. We’re mostly installing the package we need for apt-cacher-ng and then copying the config.
My config is long and commented because I took the template and edited it, but these are the active lines in the config.
1
2
3
4
5
6
7
8
9
10
11
12
13
CacheDir: /var/cache/apt-cacher-ng
LogDir: /var/log/apt-cacher-ng
Port:3142
BindAddress: 0.0.0.0
Remap-debrep: file:deb_mirror*.gz /debian ; file:backends_debian # Debian Archives
Remap-uburep: file:ubuntu_mirrors /ubuntu ; file:backends_ubuntu # Ubuntu Archives
Remap-debvol: file:debvol_mirror*.gz /debian-volatile ; file:backends_debvol # Debian Volatile Archives
ReportPage: acng-report.html
PidFile: /var/run/apt-cacher-ng/pid
ExTreshold: 4
LocalDirs: acng-doc /usr/share/doc/apt-cacher-ng
PassThroughPattern: .* # this would allow CONNECT to everything
PassThroughPattern: download\.docker\.com:443$
With some work, you can cache and forward https repos, but I never went through that work and just allow the docker.com repo to pass through and not be cached.
I also have a playbook I run to set the clients up here. The magic is mostly here
1
2
3
4
5
6
7
8
- name: Configure apt-cache
  become: true
  copy:
    src: 01proxy
    dest: /etc/apt/apt.conf.d/01proxy
    owner: root
    group: root
    mode: 0644
That copies my 01proxy file which simply contains this
1
2
Acquire::http::Proxy "http://<IP to apt-cacher-ng host>:3142";
Acquire::HTTP::Proxy::download.docker.com "DIRECT";
And voíla, that’s it really.
Troubleshooting apt-cacher-ng
I only had a single issue with apt-cacher-ng since I’ve been running it - I filled the disk up once and it broke. This caused updates to fail to communicate with the cache. The disk was full, the service stopped, and requests were no longer being handled. Once I checked the apt-cacher-ng host, it was obvious the disk was full since all my commands were failing to run because of no disk space. This was a while ago, but these were the steps from my bash history to get it working again.
1
2
3
4
   16  service apt-cacher-ng stop
   17  rm -rf /var/cache/apt-cacher-ng/
   18  service apt-cacher-ng start
   19  reboot
Pretty straight forward from there, but very little examples I could find online of people running into that problem, so maybe I just got unlucky or finally paid the price for giving all my containers 8GB disks.
So that’s it
That’s it, those services save me a bunch of time and effort over the course of running this swarm. Thanks for reading hope you got something useful.