Part 2 - Some More of the Setup
So now we have an account and it’s off to the races right? No! There’s some housekeeping to do first. The most important AWS skill to have is reading your bill. We’ll walk through a bill of mine and how to find out where you’re spending money and then get into logging. After the bill, logging is one of the most important controls you can have in an AWS account. Hopefully you prevent security incidents from happening enforcing strong access controls everywhere, but if you goof, it’s important to know somethings up through the bill and be able to work backwards and fix what happened.
Once this stuff is set up manually, in the next (weeks??) post I’ll walk through getting some snazzier deployment methods together, focusing on CloudFormation and Terraform and we’ll do the same thing over again but look cooler when we do.
The Rosetta Stone of Where Your Money Went
If you’re going to get serious with AWS, you absolutely have to understand your bill. Every month, AWS sends you a bill for everything you spent. Between the first and last day of the month, AWS will track your charges and provide about daily updates of the money you’re spending. Some services will show costs incurred more frequently, but I’ve found it takes about 24 hrs for everything you did to show up in your bill. Being able to read a bill effectively is part art, part science, and part spending way too much money one month and swearing to never do it again.
I’ve accidentally spent too much money by doing one or more of the following:
- Leaving Application Load Balancers Running
- Leaving EC2 instances in random regions or accounts running
- Deploying multiple Config rules before prices went down
- Buying more domains than I could possibly use
Oh yeah, they do charge for access to the AWS Cost Explorer, but I’ve never seen it show up in my bill in a significant way, you’ll probably only see it if you hit the API a ton to generate automated, granular reports, as you can see here.
A Guided Tour
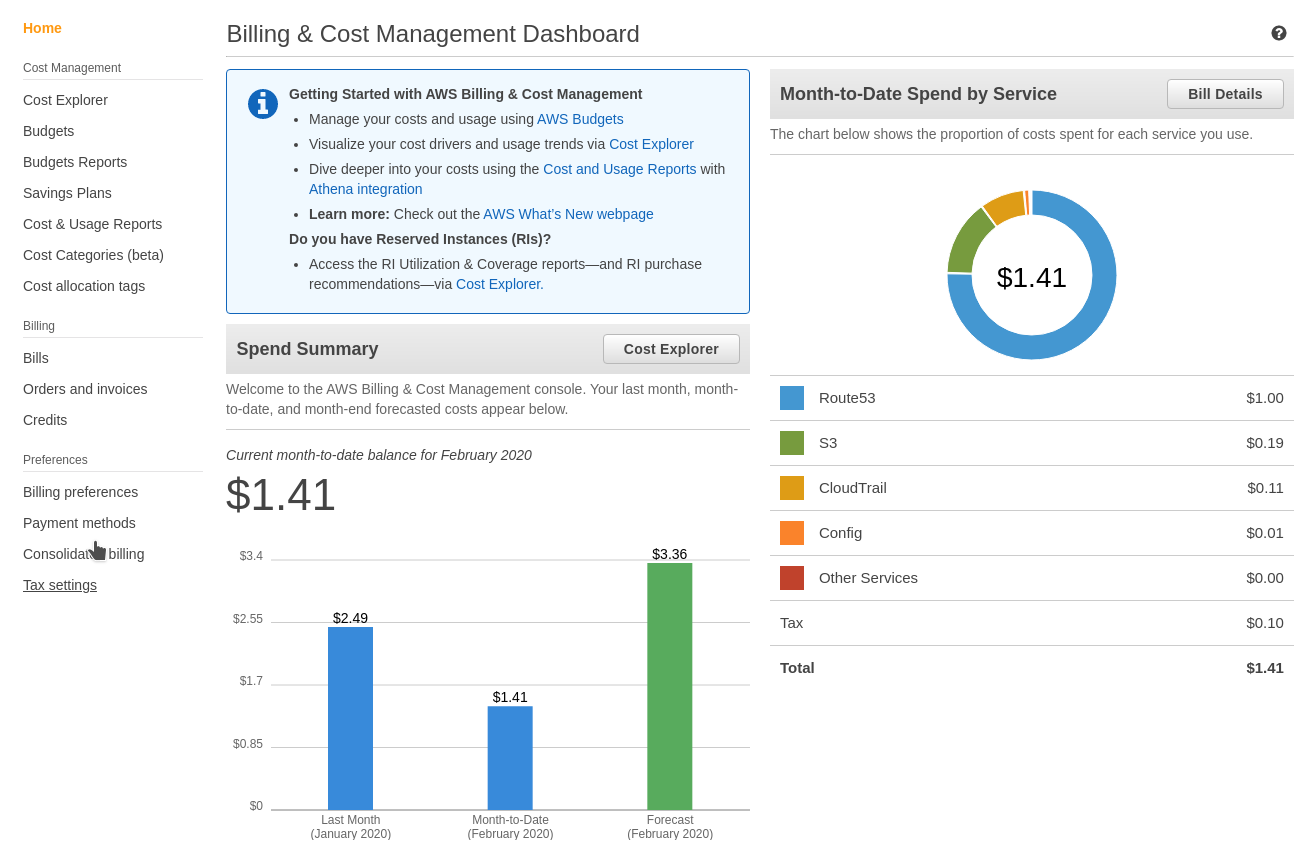
Anyway, you’ll need to be in the root account for this, log in as the IAM User you created and protected with 2FA (you did that, right!?!). Under Services at the top, search Billing and click it to go to the Billing & Cost Management Dashboard. As you can see, I’m going pretty wild.
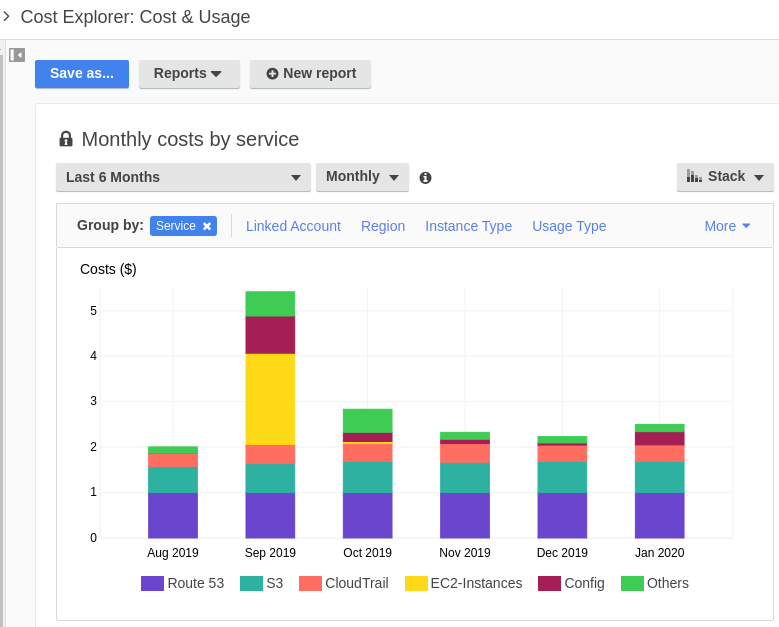
Click Cost Explorer and then Monthly Spend by Service View. This won’t be super interesting if you haven’t generated any charges, but you can see in my account a breakdown of money spent by service. The default view is 6 months, but you can toggle timeframes to get much more granular and zero in on what days you generated the most costs.
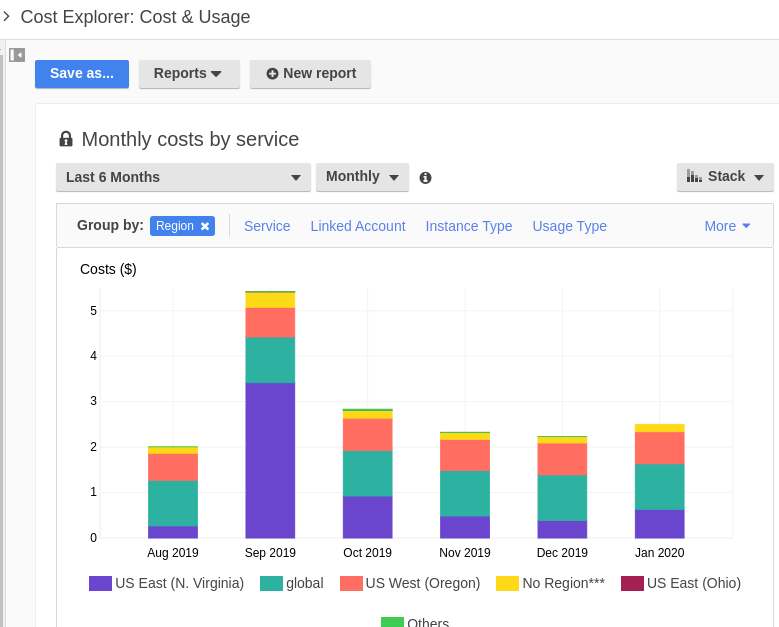
In the Group By section, you can click other options to find, for example, exactly where you deployed that rogue EC2 instance thats spending your money. This is that console sorted by region, but another very interesting breakdown is by account. This is useful if you launched something in a region or account and forgot to shut it down.
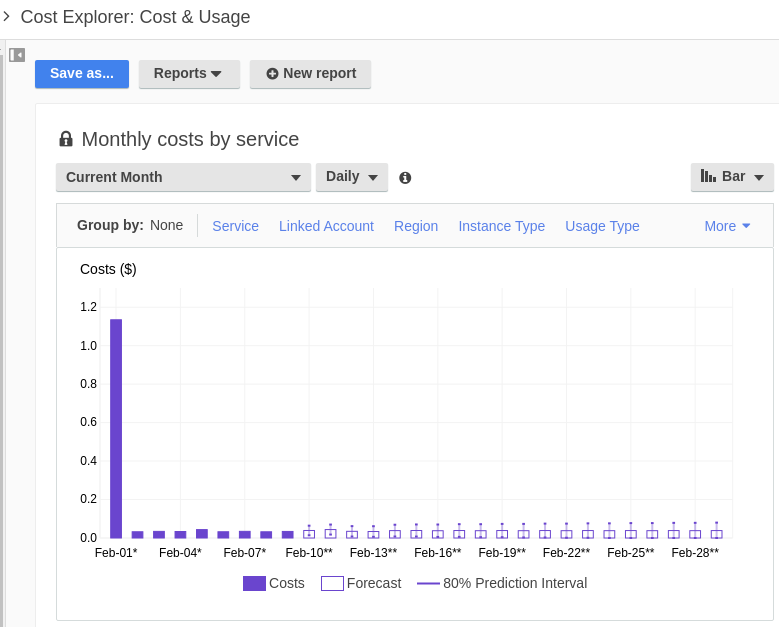
Breaking down a single month by day is always interesting too. You can see a spike on the first when recurring services are billed. For me, this is typically hosted zones and domain names in route53.
While this was a very quick look into the the AWS Cost Explorer, there is of course pretty good documentation available straight from AWS themselves. This fantastic thread from @QuinnyPig puts a lot of it into perspective. He generally gives excellent advice about AWS and where all your money went, so follow him.
Finally, if you find yourself spending more money than you intended to, open a support case with AWS. They have no obligation to forgive your bill, but I’ve been shocked by how forgiving they’ve been in the past to other customers who accidentally spent too much.
Why Cloudtrail Matters
Cloudtrail is the bread and butter of AWS Cloud logging. The User Guide is excellent, the Pricing is pretty transparent, and the service is basically free if you’re not doing anything fancy with it. AWS has a great brief on the service you should read because it really helps you plan what and how you want to log.
Cloudtrail tracks all write and most read events in your account. It does not track, by default, AWS S3 access and AWS KMS events unless you explicitly tell it to. You can tell it to focus on a subset of your buckets for read and write events, but you would tend to want to do that if you have very sensitive data in there you need to track access to.
For my purposes, I run a single organization of about half a dozen accounts I don’t make any money from and don’t have any legal or compliance requirements for. Many of the very excellent posts about logging strategies are great for running an organization for a business, but overkill for my purposes.
By default, Cloudtrail will track the last 90 days of activity for free, no questions asked. Additionally, those events cannot be deleted. If an attacker takes over your account and wipes out your logging infratructure, you still have 90 days of logs you can work with (Thanks AWS!). To go a bit further, you can tell cloudtrail to log to an S3 bucket.
A Sample Event
Inside Cloudtrail, you can use the dashboard to view most recent events. One will likely be a Console Login. Interesting parts are the userIdentity.principalId, userIdentity.arn, and userIdentity.userName. userAgent is cool because you can tell what browser they say they’re using and use this for anomaly detection when you get fancier. eventType is interesting too because it tells you what happened.
1
2
3
4
5
6
7
8
9
10
11
12
13
14
15
16
17
18
19
20
21
22
23
24
25
26
27
28
29
{
    "eventVersion": "1.05",
    "userIdentity": {
        "type": "IAMUser",
        "principalId": "AIDAIXE123456789HQZBA",
        "arn": "arn:aws:iam::111111111111:user/remotephone-admin",
        "accountId": "111111111111",
        "userName": "remotephone-admin"
    },
    "eventTime": "2020-02-10T05:11:54Z",
    "eventSource": "signin.amazonaws.com",
    "eventName": "ConsoleLogin",
    "awsRegion": "us-east-1",
    "sourceIPAddress": "1.2.3.4",
    "userAgent": "Mozilla/5.0 (X11; Linux x86_64) AppleWebKit/537.36 (KHTML, like Gecko) snap Chromium/80.0.3987.87 Chrome/80.0.3987.87 Safari/537.36",
    "requestParameters": null,
    "responseElements": {
        "ConsoleLogin": "Success"
    },
    "additionalEventData": {
        "LoginTo": "https://console.aws.amazon.com/console/home?state=hashArgs%23&isauthcode=true",
        "MobileVersion": "No",
        "MFAUsed": "Yes"
    },
    "eventID": "f626679f-23e9-42f9-9332-4ee676e5212c",
    "eventType": "AwsConsoleSignIn",
    "recipientAccountId": "111111111111"
}
Sumologic has put out some pretty good documentation on what to do with these logs. To jump way ahead, you could read how to use other AWS services, like Athena, to analyze your logs.
Setting Cloudtrail Up
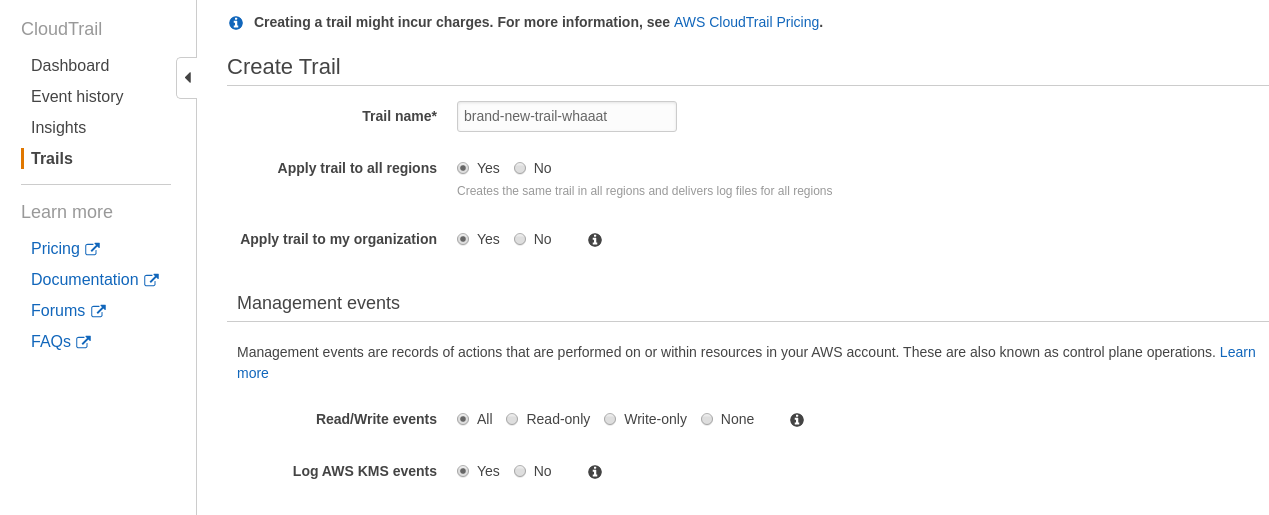
In the Services option at the top, search for Cloudtrail and Click it. One of the most important settings you’ll need to be sure is set is for Cloudtrail to record events from all regions. You’ll also want to record all read and write events.
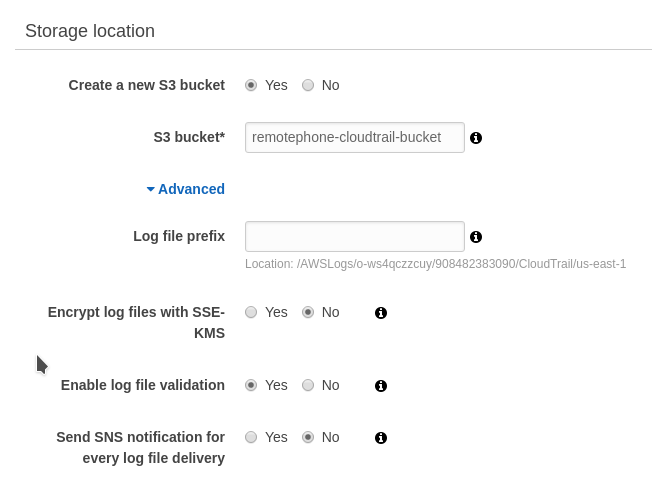
When you create this trail, you can set it to create a new S3 bucket. Handily, AWS handles the S3 bucket permissions for you. You’ll need to pick a bucket name that’s unique for your logging.
I handle an bucket that logs for multiple accounts and haven’t had to manually modify this bucket policy. AWS does all this work for you, you don’t have to worry about it. This is my bucket policy, anonymized because I’m a suspicious person:
1
2
3
4
5
6
7
8
9
10
11
12
13
14
15
16
17
18
19
20
21
22
23
24
25
26
27
28
29
30
31
32
33
34
35
36
37
38
39
40
41
42
43
44
45
46
47
48
49
50
51
{
    "Version": "2012-10-17",
    "Statement": [
        {
            "Sid": "AWSCloudTrailAclCheck20150320",
            "Effect": "Allow",
            "Principal": {
                "Service": "cloudtrail.amazonaws.com"
            },
            "Action": "s3:GetBucketAcl",
            "Resource": "arn:aws:s3:::thisismybucketherearemanylikeit"
        },
        {
            "Sid": "AWSCloudTrailWrite20150320",
            "Effect": "Allow",
            "Principal": {
                "Service": "cloudtrail.amazonaws.com"
            },
            "Action": "s3:PutObject",
            "Resource": [
                "arn:aws:s3:::thisismybucketherearemanylikeit/AWSLogs/111111111111/*",
                "arn:aws:s3:::thisismybucketherearemanylikeit/AWSLogs/222222222222/*",
                "arn:aws:s3:::thisismybucketherearemanylikeit/AWSLogs/333333333333/*",
                "arn:aws:s3:::thisismybucketherearemanylikeit/AWSLogs/444444444444/*",
                "arn:aws:s3:::thisismybucketherearemanylikeit/test/AWSLogs/555555555555/*",
                "arn:aws:s3:::thisismybucketherearemanylikeit/test/AWSLogs/666666666666/*",
                "arn:aws:s3:::thisismybucketherearemanylikeit/test/AWSLogs/777777777777/*",
                "arn:aws:s3:::thisismybucketherearemanylikeit/test/AWSLogs/888888888888/*"
            ],
            "Condition": {
                "StringEquals": {
                    "s3:x-amz-acl": "bucket-owner-full-control"
                }
            }
        },
        {
            "Sid": "AWSCloudTrailWrite20150319",
            "Effect": "Allow",
            "Principal": {
                "Service": "cloudtrail.amazonaws.com"
            },
            "Action": "s3:PutObject",
            "Resource": "arn:aws:s3:::thisismybucketherearemanylikeit/AWSLogs/o-ws4qczzcuy/*",
            "Condition": {
                "StringEquals": {
                    "s3:x-amz-acl": "bucket-owner-full-control"
                }
            }
        }
    ]
}
While this is a policy for an organization with a few accounts in it, you likely won’t see anything this complex. If that bucket policy makes no sense to you whatsoever, we’ll go over that in a different post, but for now you are welcome to start reading ahead.
Ok that’s enough
It’s getting late. You can read your bill and hopefully know who made it get so big. Next time, I’ll cover creating billing alerts, creating a new account, and really getting your organization off the ground and starting to share things between accounts.

